Use AI-Assisted Authentication

Learn how to configure AI-Assisted Authentication for Polaris fAST Dynamic to simplify DAST scans of sites that require authentication.

Overview

Note: AI-Assisted Authentication can be configured through the Polaris web UI or by uploading a scan settings JSON configuration file. Email MFA is not currently supported in the web UI.

Using machine learning, computer vision techniques, and a large language model (LLM), AI-Assisted Authentication detects the authentication flow of web application targets and auto-configures the site authentication settings. This allows you to run automated DAST scans of authenticated web applications with minimal user configuration.

To set up AI-Assisted Authentication, you provide a login URL, username and password, and multi-factor authentication (MFA) details (if needed). When you start a DAST scan, AI-Assisted Authentication does the following:

  • Captures screenshots of input forms, buttons (e.g. Log in, Submit), and other relevant UI elements.
  • Dismisses cookie popups and banners.
  • Analyzes screenshots using an LLM to create a customized authentication script.
  • Completes all login steps automatically.
  • Triggers a DAST scan of the web application.

You do not need to configure CSS selectors, form values, or other advanced settings because they are auto-detected.

The feature includes support for sites that implement:

  • Simple authentication: Form-based authentication via a username and password. Single-page and multi-page login sequences are both supported.
  • Time-based one-time password (TOTP) MFA
  • Email MFA (through JSON configuration only)

Security controls such as CAPTCHAs and security questions are not supported.

Data privacy

The AI-Assisted Authentication feature of Polaris fAST Dynamic communicates with an LLM that runs on a private cloud service. Please note:

  • None of the prompts or responses exchanged between the feature and the LLM are used to:
    • Train or improve the LLM.
    • Improve the LLM provider's other products or services.
  • To facilitate AI-Assisted Authentication, screenshots of login pages associated with the login URL that you configure in your authentication profile are sent to the LLM.
  • No source code, site credentials, or confidential information are transmitted to the LLM.
  • Data exchanged between the feature and the LLM is encrypted for storage and transmission.

Enable AI-Assisted Authentication (Web UI)

You can select AI-Assisted Authentication when creating a DAST project for a web application target (see Create a DAST project for a web application target).
  1. Navigate to the DAST project creation screen (Portfolio > Projects > +Create New Project(s) > DAST).
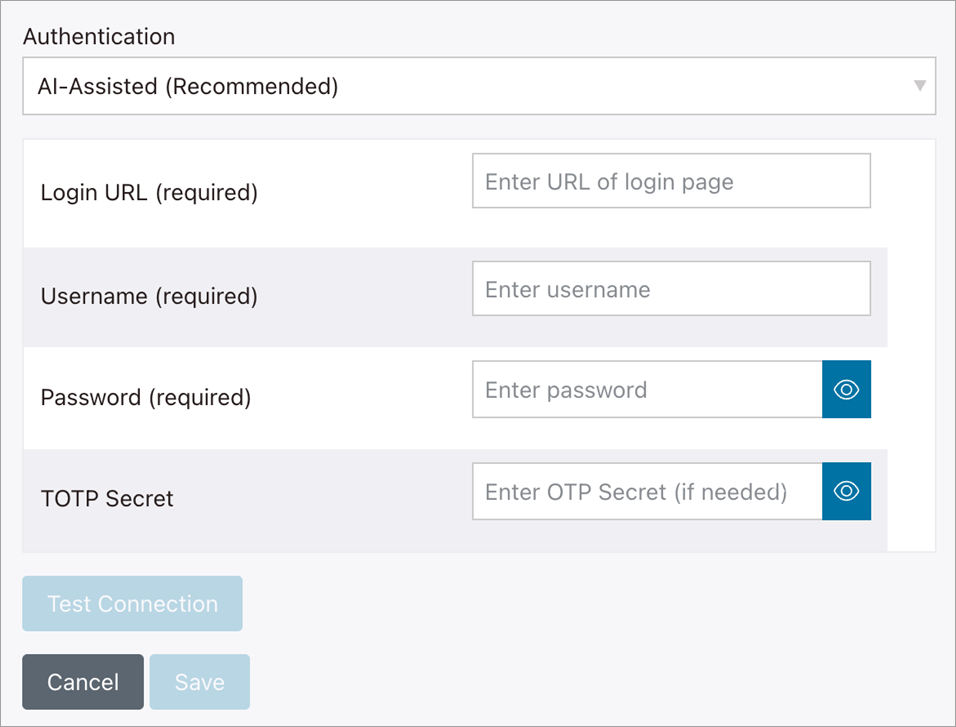
  2. Complete the steps in Create a DAST project for a web application target, making sure to select AI-Assisted (Recommended) from the Authentication dropdown:


  3. Enter the following information:
    • Login URL (required): The URL of the login page of the target web application. Must be accessible to the DAST scanner.
    • Username (required): The username used to log in.
    • Password (required): The password used to log in.
    • TOTP Secret (optional): The time-based one-time password (OTP) Secret that is configured for the target web application. Only required if the web application uses TOTP multifactor authentication (MFA) for user logins.
  4. Save the DAST project.

Enable AI-Assisted Authentication (JSON)

You can enable AI-Assisted Authentication by uploading a scan settings JSON configuration file. The settings you specify in the file will be applied to the default scan settings. Note that fAST Dynamic does not support multiple authentication profiles at this time. The scanner will default to the first authProfile in the array if multiple profiles are defined.

  1. Create a new JSON file in a text editor.
  2. Configure an authProfile for AI-Assisted Authentication. An authProfile is defined as an array of JSON objects under authProfiles. You can copy and paste the following examples:
    Figure 1. AI-Assisted Authentication: Simple auth example
    {
        "version": "0.25",
        "authProfiles": [
            {
                "name": "AIAssistedSimple",
                "authenticators": [
                    {
                        "loginType": "ai",
                        "settings": {
                            "loginURL": "https://myapp.blackduck.com",
                            "username": "example_user@blackduck.com",
                            "password": "ABCDEFGH"
                        }
                    }
                ]
            }
        ]
    } 
    • name: The name of the authentication profile. Must be unique.
    • authenticators: An array of authentication settings to use with the authProfile.
    • loginType: Set to ai to enable AI-Assisted Authentication.
    • loginURL: The URL of the login page of the target web application to scan. This must be accessible to the fAST Dynamic DAST scanner.
    • username: The username used to log in.
    • password: The password used to log in.
    Figure 2. AI-Assisted Authentication: MFA auth example
    {
        "version": "0.25",
        "authProfiles": [
            {
                "name": "AIAssistedMFA",
                "authenticators": [
                    {
                        "loginType": "ai",
                        "settings": {
                            "loginURL": "https://myapp.blackduck.com",
                            "username": "example_user@blackduck.com",
                            "password": "XXXX",
                            "otpEmail": <DAST_PROJECT_ID>@mfa.dast.blackduck.com,
                            "otpTimeSecret": "<OTP_SECRET_ID>"
                        }
                    }
                ]
            }
        ]
    }                            
    • otpEmail: The Black Duck MFA email address associated with the DAST project, in the format <dast-project-ID>@mfa.dast.blackduck.com. To find the project ID, copy the alphanumeric string after /projects/ in your browser address bar - /projects/<dast-project-ID>. Your web application must be configured to send MFA emails to this email address.
    • otpTimeSecret: The TOTP Secret Key that is configured in your MFA provider, e.g. WCUXRQCOKQJJWMPZ.
  3. Save the file, e.g. scan-settings-ai-auth.json.
  4. In the Polaris Web UI, upload the JSON settings file to the DAST project creation page. You can drag and drop the file to the Upload .json file box or browse for it on your computer.
  5. Complete the other fields on the DAST project creation page. See Create and test DAST projects for web applications and APIs for details.
  6. Save the DAST project.
    Now, you can run a DAST test on the project from the Polaris Web UI. AI-Assisted Authentication will detect the site's login flow, auto-configure authentication settings, and log in automatically. If AI-Assisted Authentication fails during a DAST scan, please open a Support ticket from the Help page in Polaris and provide details of the error.