Get started: Organization Application Manager

Before you begin, we recommend reading the following:

Goals

As an Application Manager, you play an important part in bringing your team into Polaris.

By the end of this process, you will:

  • Create at least one application
  • Add a SAST & SCA project to your application
  • Add users to the application

Depending on the size of your organization, you may need to repeat the process.

Review policy settings

In Polaris, policies automate actions when issues or components are detected in tests, and automate scans of projects or branches on a weekly or daily basis.

Policies are assigned to projects and branches, and they consist of rules about when tests must run or what action is taken when issues or components are captured in tests. Black Duck provides default issue, component, and test scheduling policies. When you create a project, it will have default policies chosen either by Black Duck or your organization. You might have a variety of policies to choose from if you want to change the policies for your project. Organization Admins and Organization Application Managers can create and manage issue policies on the Policies page.
Note: For more information, see Issue policies, Component policies, and Test scheduling policies.

Create an application

  1. Go to Portfolio on the left sidebar.
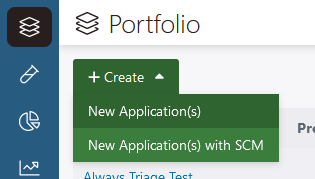
  2. Select + Create > New Application(s).

    Screenshot of the Create Application button.
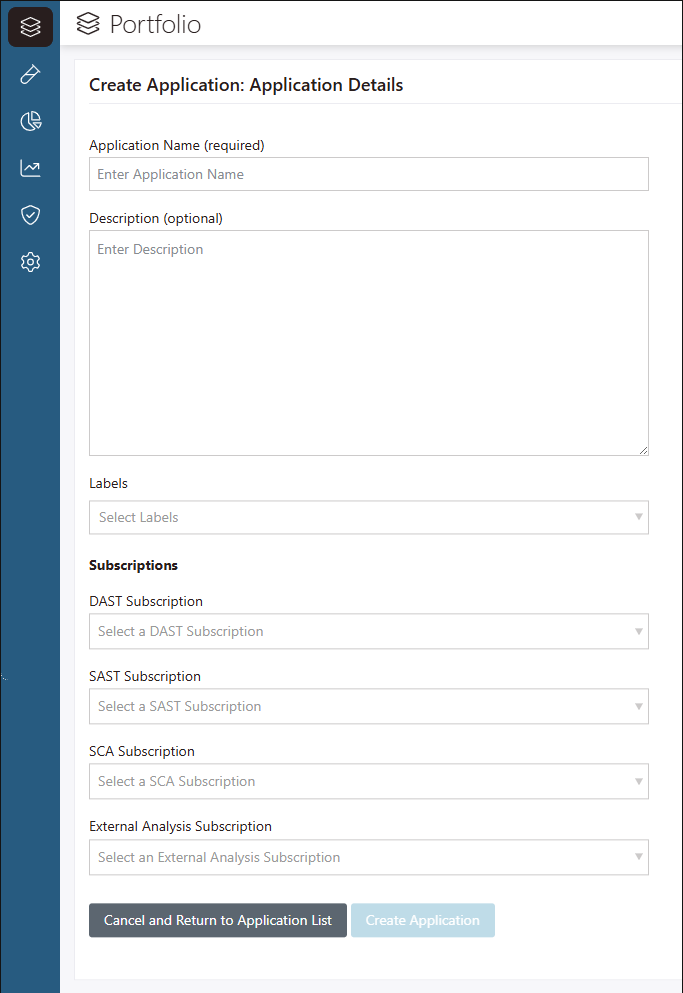
  3. Enter your application's details.

    Create Application: Application Details.
    Table 1. 'Application Details' fields
    Field name Description Field Limits*
    Application Name (required) The name must be unique within your organization.
    • Length: 255 characters
    • If the name contains multiple spaces, it will be converted into a single space.
    Description (optional) A short description of the application that will be useful to users from your organization.
    • Length: 2048 characters
    Tags (optional) You can create tags to classify your applications. This is useful for grouping applications when they all belong to a larger program.
    • Length: 256 characters
    Note: *Characters can include alphanumeric, punctuation marks, symbols (e.g., @, #, $) and spaces.
  4. Select the application's subscriptions.
    The subscriptions you select should provide the types of testing you require, the desired number of projects and branches, and a triage type suitable for the project.
    Note: When you select Use Application subscriptions, you must select at least one SAST Subscription, SCA Subscription, or DAST Subscription to proceed.
  5. Click Create Application.

Add a SAST & SCA project to an application

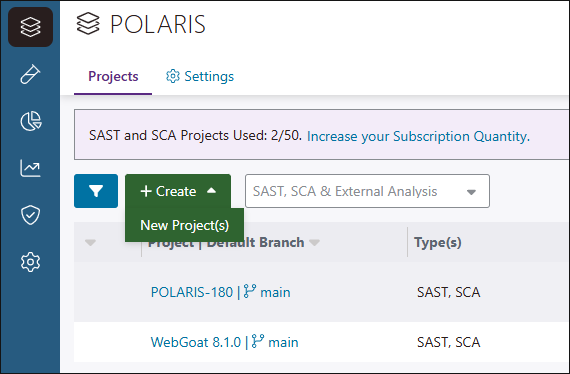
  1. Select + Create > New Project(s).

    Screenshot of the Add Project button location.
  2. Under Project Type, ensure SAST & SCA is selected.
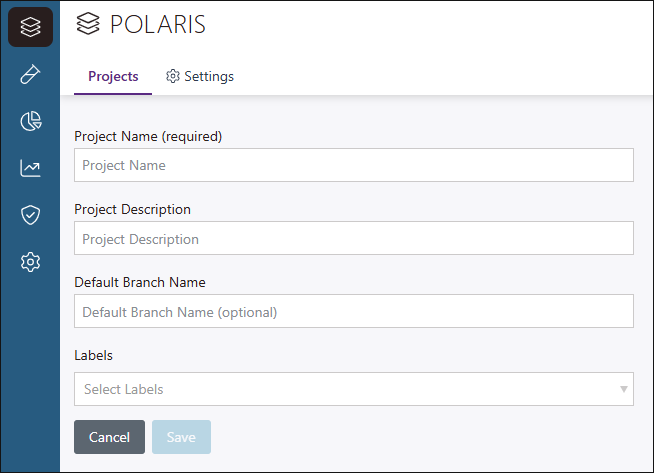
  3. Enter the project's details.

    Screenshot of the Add Projects Form.
    Table 2. 'Add Projects' fields
    Field name Description Field Limits*
    Project Name (required) Each name must be unique within the organization.
    • Length: 255 characters
    Project Description (optional) The description should be useful to users with access to your application.
    • Length: 2048 characters
    Default Branch Name (optional) Enter the name of the project's default branch. If you don't specify a branch name, "main" is used.
    • Length: 255 characters
    Note: *Characters can include alphanumeric, punctuation marks, symbols (e.g., @, #, $) and spaces.
  4. (Optional) Click Add Another Project to create more than one project at the same time.
  5. Click Add.

Add users to an application

To grant users or groups access to an application, follow these steps:
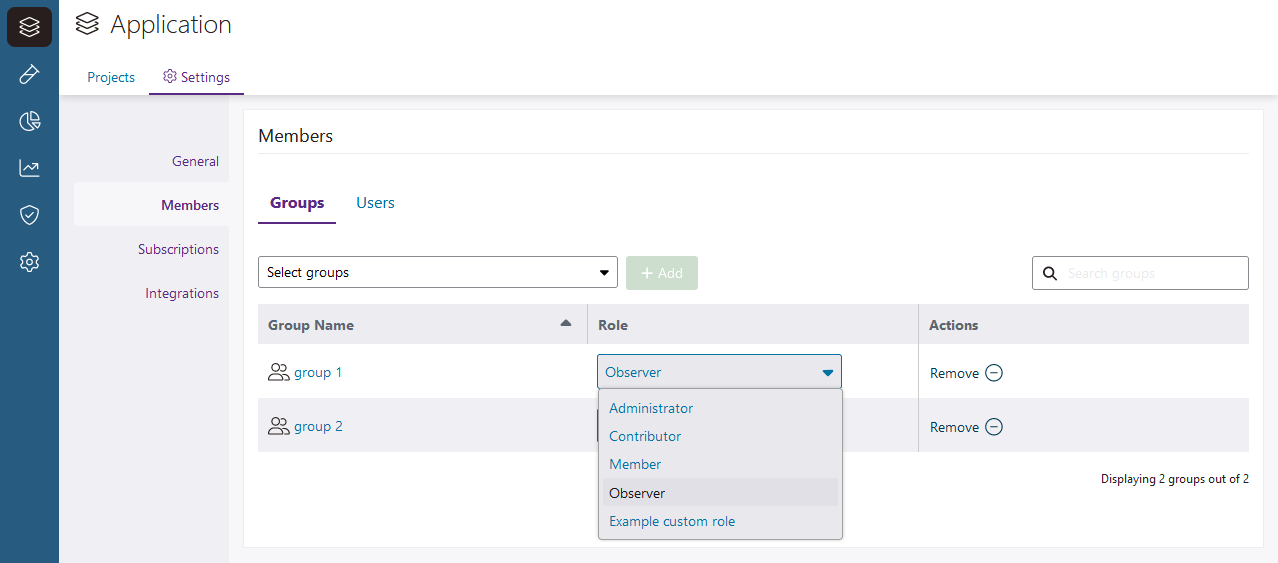
  1. After you open an application, go to Settings > Members.
  2. To give groups access to the application:
    1. Select groups with the Groups pulldown menu, and then select Add.
      Note: By default, groups you add are assigned the Observer role.
    2. If necessary, change the group's application-level role (Application Manager, Contributor, or Observer) with the pulldown menu in the Role column.


      Note: For more information on roles and their permissions, see Roles and permissions.
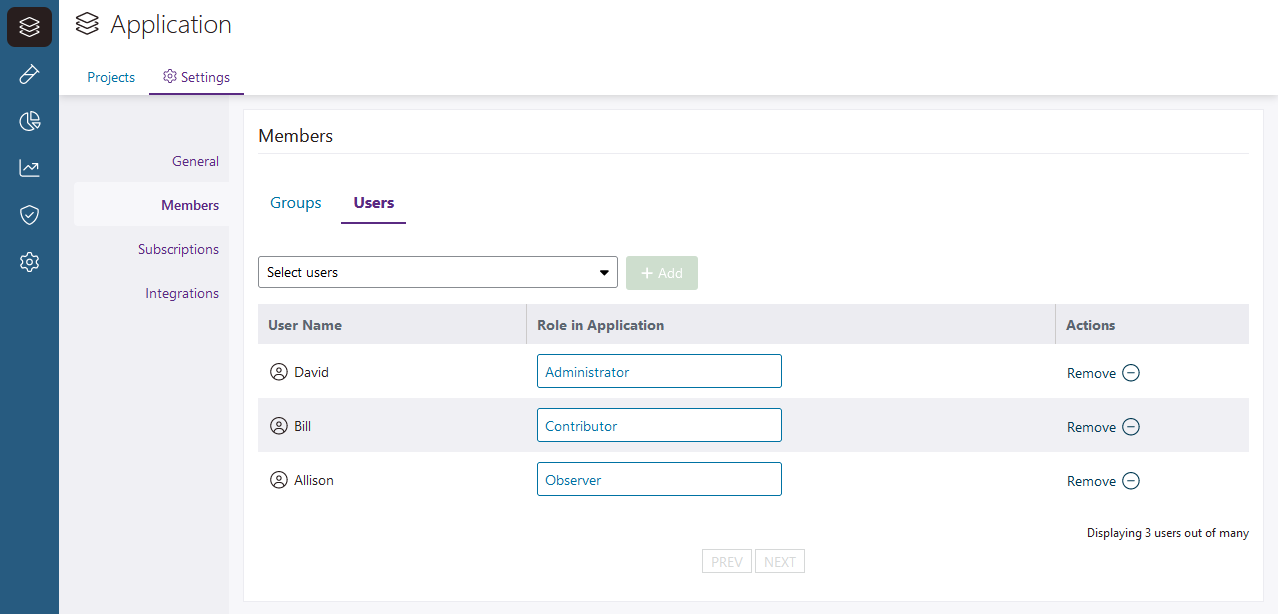
  3. To give users access to the application:
    1. Go to Users.
    2. Select users with the Users pulldown menu, and then select Add.
      Note: Users must already be invited to Polaris before you add them to the application. By default, users you add are assigned the Observer role.
    3. If necessary, change the user's application-level role (Application Manager, Contributor, or Observer) with the pulldown menu in the Role in Application column.


Upload files and start testing

Note: Before uploading, see the limitations for uploads on the Support page. There are guidelines for file type and size.
Follow these steps to upload and test source files for SAST & SCA project:
  1. Navigate to Portfolio.
  2. Select an application.
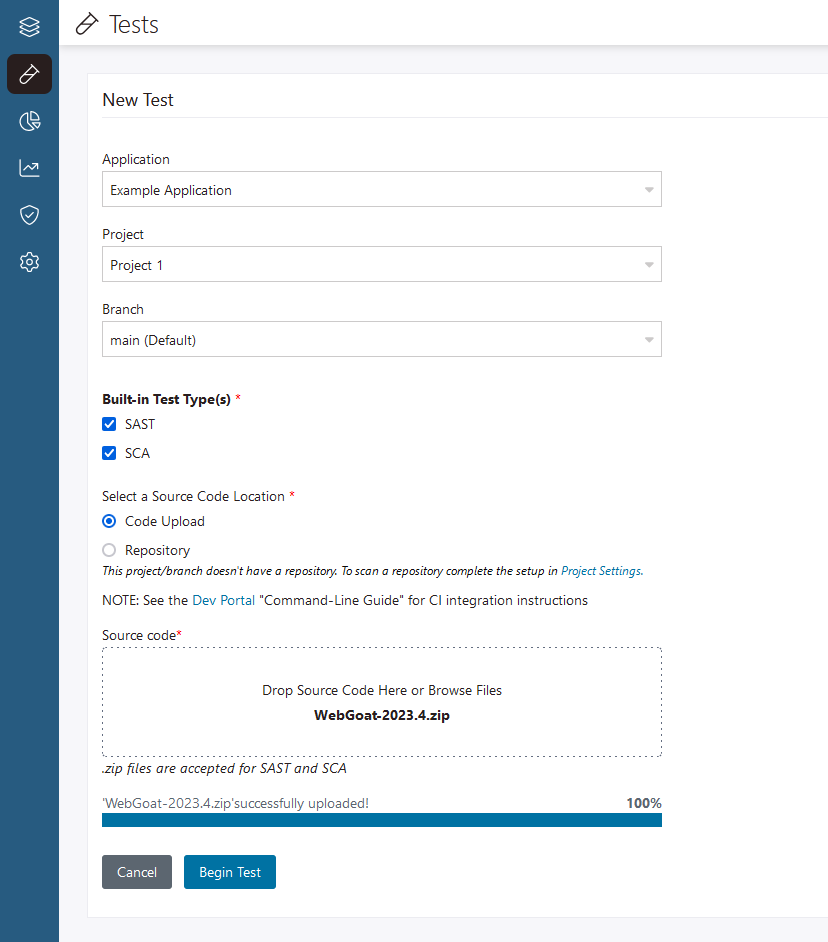
  3. Locate the SAST & SCA project you wish to test, click the ellipse icon in the project's row, and select New Test.


    The New Test page opens.

  4. (Optional) Select a branch to test.
  5. Use the SAST and SCA checkboxes to select test to run.
    Note: These options depend on what your Application Admin has made available for the project.
  6. Select Code Upload.
  7. Upload the files you want to test by dragging and dropping them into the browser window. Or click Browse Files and use the file chooser in your operating system to select files.


    Note: For Code Uploads, source code filenames can include letters, digits, and the characters “.”, “-” and “_”. No other characters or spaces are allowed.
  8. After the upload completes, click Begin Test.

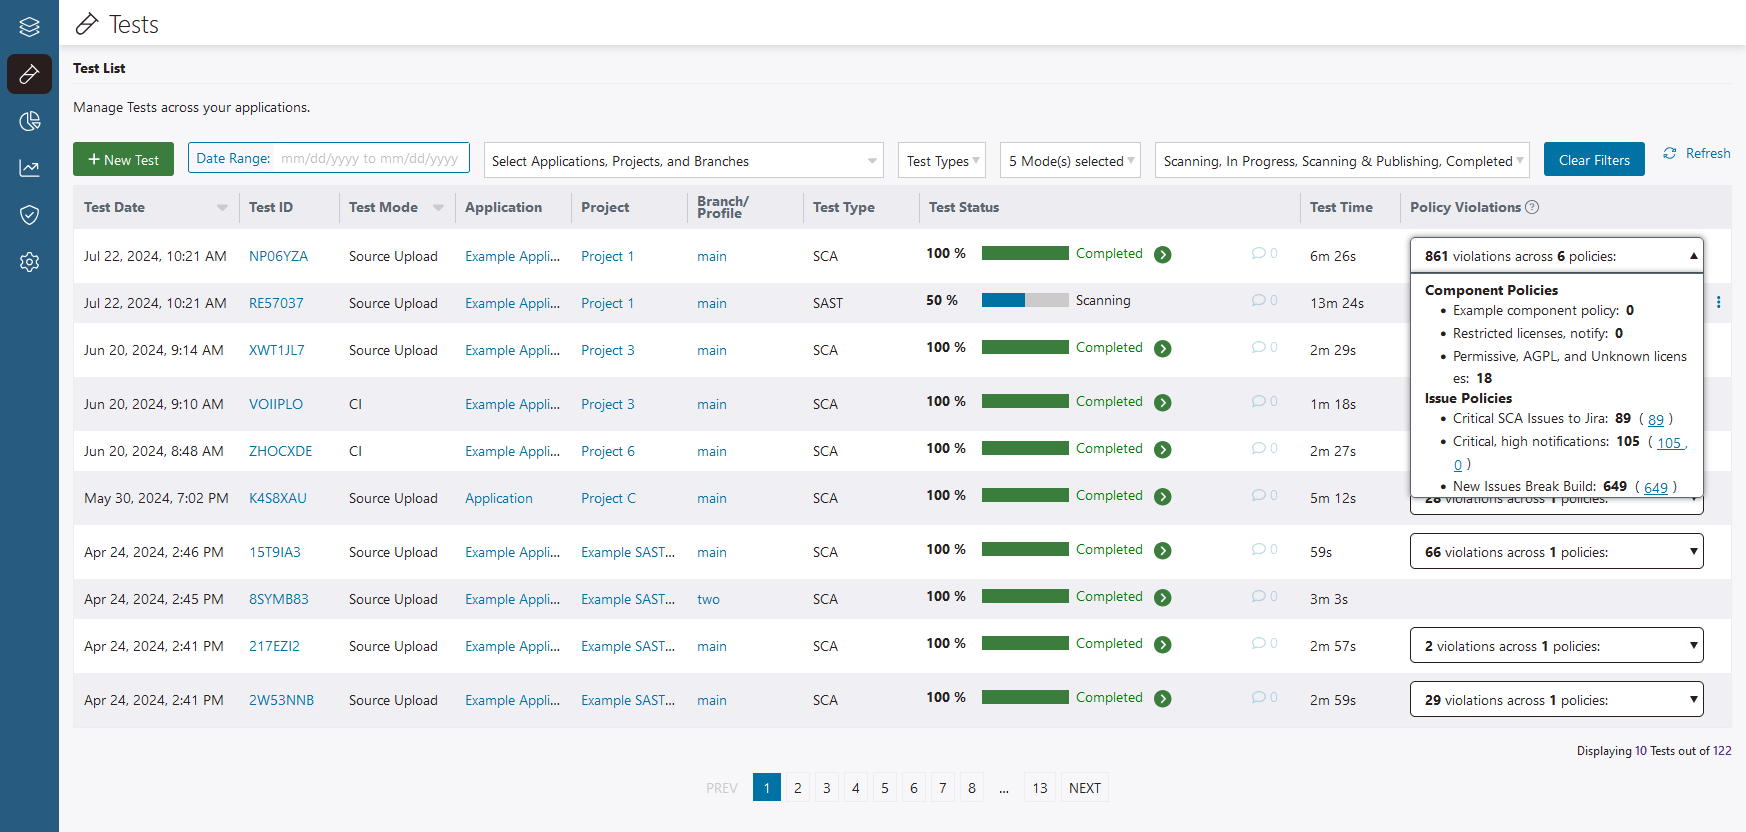
    You can monitor the progress of tests any time by navigating to Tests on the left-hand navbar. Test status is shown there, with the most recent tests listed first. Filter tests by date, type, mode, status, and the application, project, or branch tested.

    Note: If it is the first scan for your project, you might receive email communications from the Black Duck team that require a response in order for testing to finish.

Monitor tests and get test results

  1. Navigate to Tests in the left-hand navigation menu.


  2. If numerous tests are showing, you might need to filter to see your test. First try filtering on test status, for new tests.

    Depending on the size of your project, a test may take a number of hours to finish running. When the test is complete the progress bar shows 100 percent and a green circle enclosing an arrow appears to the right of the progress bar on the Tests page.


  3. To view test results, select the branch name in a completed test's row.

Filter and review the issues

You can get to the issues in either of the following ways:

  • Go to Portfolio, select an application, select a project, and open the Issues tab.
    Note: Use the branch pulldown (near the top of the page, next to the project name) to view test results for different branches in your project.
  • Go to Tests and select the branch name in a completed test's row.
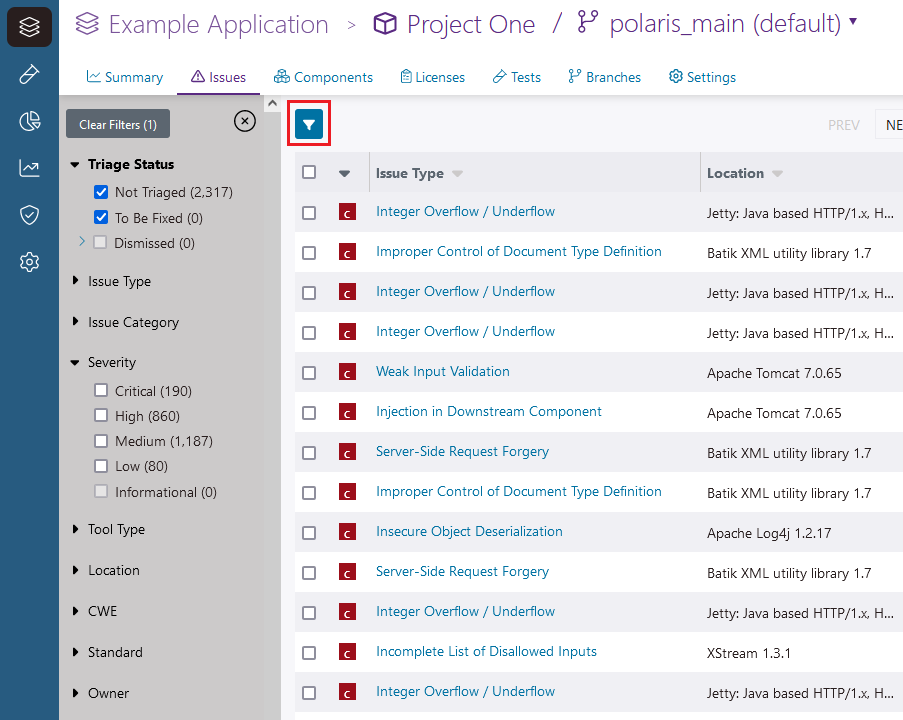
  1. Click the filter icon.

    The filters panel opens.


    Screenshot of filtering controls.
  2. Expand filter categories and use the checkboxes to apply filters.
    Try filtering the results according to issue type, severity, and triage status. (For example you might want to see issues that are not triaged, or all high severity issues that are not triaged.)
  3. After you apply a filter, select an issue in the list to open the Issue Details tab.

    Here, you can see:

    • A description of the issue and its local effects (that is, the risk it poses when present in your project)
    • A link to the Common Weakness Enumeration (CWE™) page, if available
    • A link to training resources in Secure Code Warrior, if available (and after the Secure Code Warrior integration is enabled by your Organization Administrator)
    • A link to the Common Vulnerabilities and Exposures (CVE®) page, if available
    • The Black Duck® Security Advisory (BDSA) code for the issue, if available
    • The name of the tool that discovered the issue
    • The time of the test that discovered the issue
    • A list of branches the issue is also detected in
    The Contributing Code Events tab appears when you select an issue captured by a SAST test. Here, you can see:
    • The location in your code where the issue is found
    • Detailed instructions to resolve the issue
      Note: After an Organization Administrator enables Polaris Assist, you can generate remediation guidance for SAST issues with AI. See Generate SAST remediation guidance with Polaris Assist (Beta) for more information.

    Use the issue view whenever you need to dig into an individual issue.