Integrate Multiple SCM Repositories

Prerequisites

Within the Polaris UI, Source Code Management (SCM) repository bulk integration is supported for:

  • GitHub
  • GitHub Enterprise Cloud

The following roles can initiate bulk onboarding:

  • Organization Admin
  • Organization Application Manager
  • Application Admin (limited to bulk onboarding projects and SCM connections for applications they are the admin for).

Assumptions and constraints

  • Only covers SaaS GitHub (hosted Git deployments are out of scope).
  • A concurrent subscription is required to use this feature. If an existing application is connected to an “application subscription,” then the number of projects that can be created is limited by the value determined at the time of purchase. You can bulk onboard projects to this kind of application, but only as many as the project count permits.
  • Users can only import repositories from organizations they are a member of; they cannot import repositories from public orgs that they are not a member of.
  • Only 100 repositories per hour will be onboarded. The personal access token provided will be subject to rate-limits on GitHub. If the rate limit is reached, the system does not automatically retry the operation. See Rate limits for the REST API - GitHub Docs for more information.
  • You cannot import repositories that do not belong to a GitHub organization.
  • Only one active bulk onboarding job is allowed per tenant.
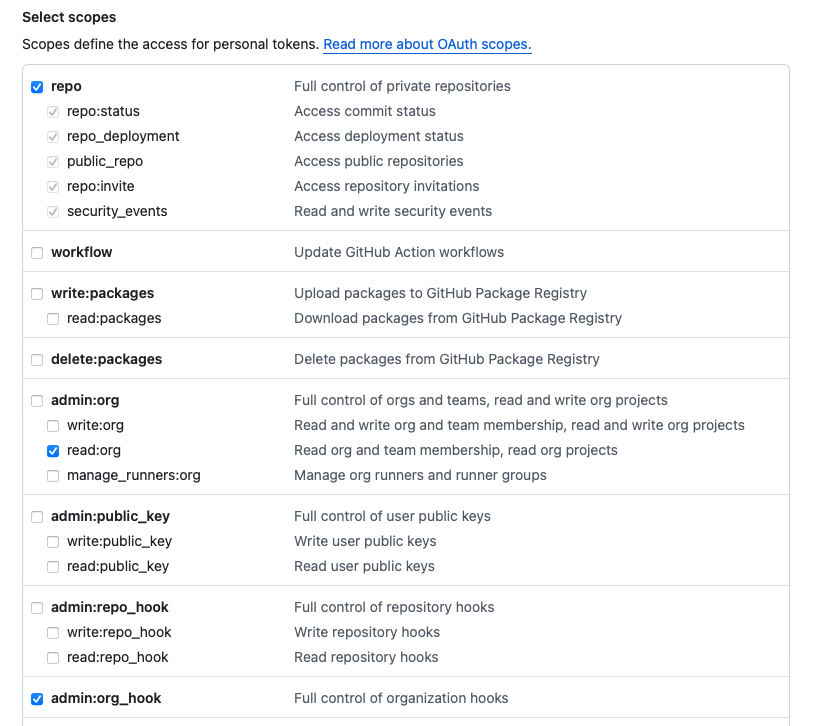
Overview

Bulk onboarding into Polaris features include:
  • Using your SCM repository to create new application(s) and project(s), or add multiple repositories to existing applications in Polaris. During this process the user can assign policies and roles:
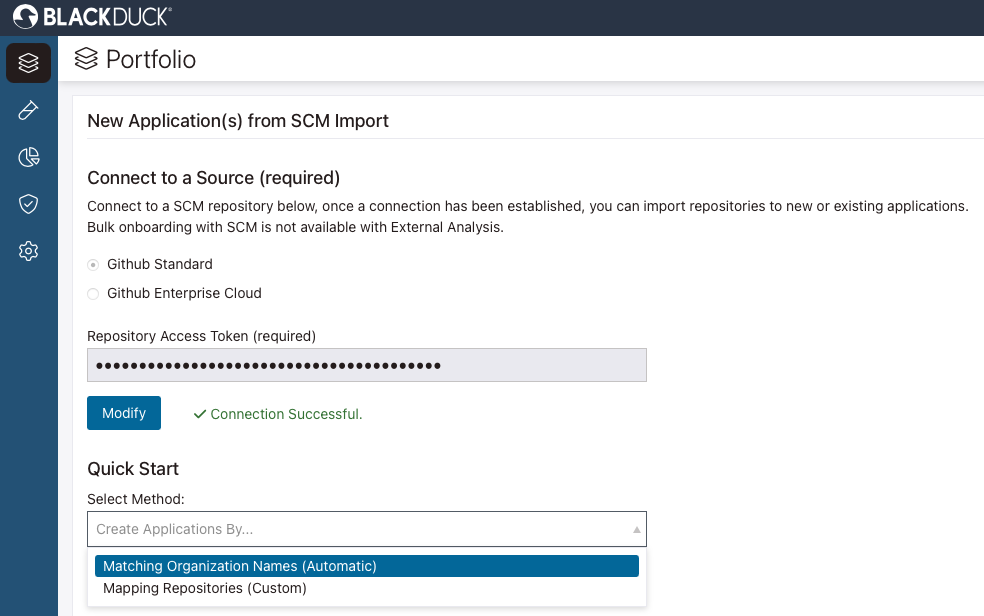
    • Automatic mapping: Polaris creates an application for each organization that can be accessed using the personal access token, and it creates a project for each repository in each organization. Application and project names match organization and repository names from GitHub, respectively.
    • Customizable mapping: Manually select the GitHub organizations and repositories you wish to add to Polaris. Use this option to create multiple repositories to be imported to a new application(s) or existing application(s).
  • Ability to update the connection credentials for all the projects under an application.
  • Import SCM repositories as projects into an existing application and assign policies to it.
  • Synchronize your SCM provider with Polaris.

In order to use any of these features, you will need to create a personal access token in GitHub.

Creating a personal access token

When integrating SCM repositories, you will need a personal access token you create in GitHub.
Note: The personal access token will be used to complete the onboarding process and will be subject to rate limits enforced by GitHub.
Note: Use of personal access token (classic) is recommended.
  1. Sign in to GitHub.
  2. In the upper-right corner of any page, click your profile photo, then click Settings.
  3. In the left sidebar, click Developer settings.
  4. In the left sidebar, under Personal access tokens, click Tokens (classic).
  5. Select Generate new token, then click Generate new token (classic).
  6. Name your token.
  7. Set the token's expiration date. To avoid issues, we recommend No expiration.

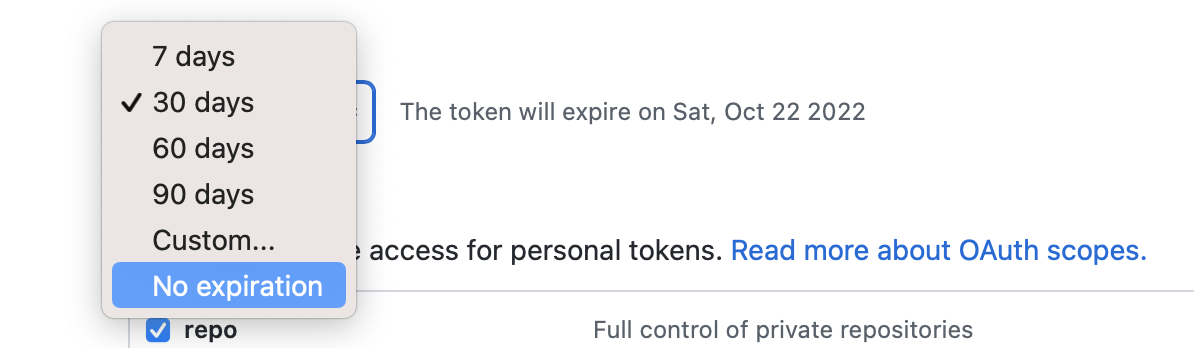
  8. Under Select scopes, select repo (all), read:org (under admin:org), and admin:org_hook.

  9. Click Generate Token.
  10. (Optional) Select the copy icon to copy the token.

  11. To use your token to access resources owned by an organization that uses SAML single sign-on, authorize the token via Configure SSO. For more information, see Authorizing a personal access token for use with SAML single sign-on in the GitHub Enterprise Cloud documentation.

Integrate application(s) and project(s) from SCM repositories

See Prerequisites before starting.
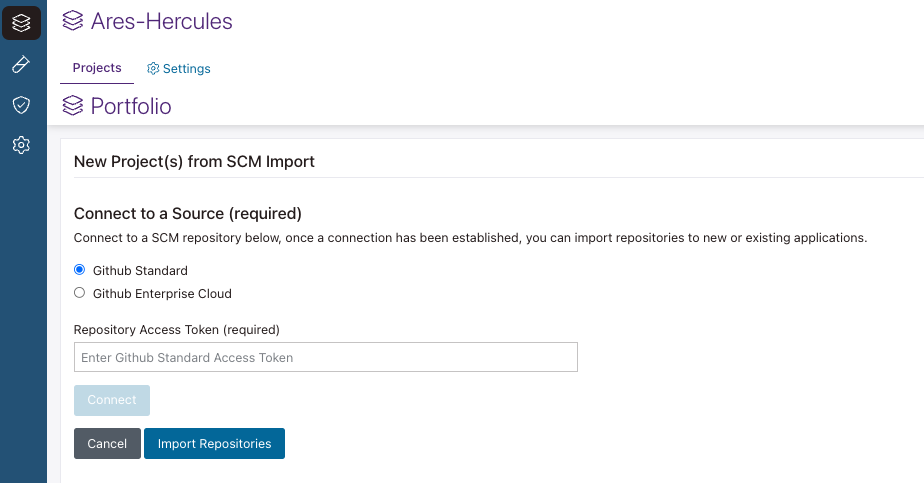
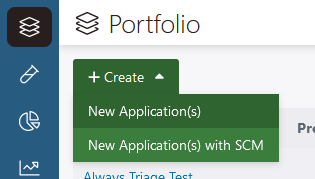
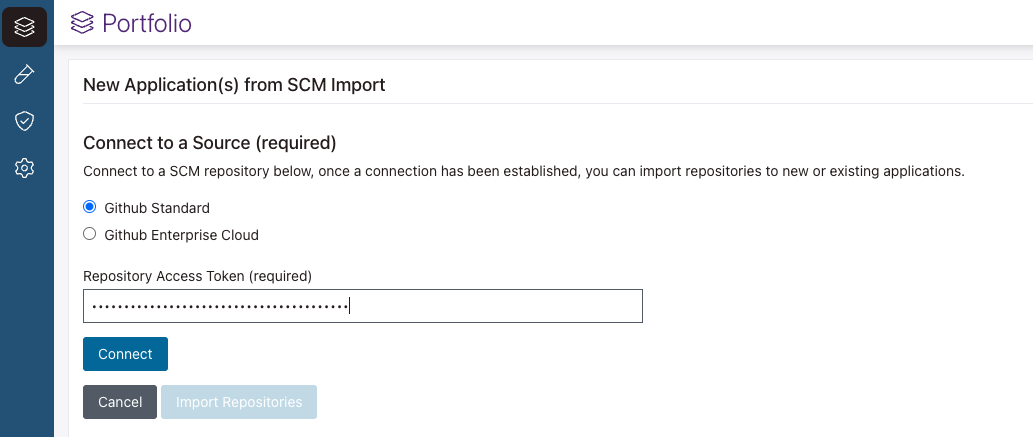
  1. On the Portfolio page, select + Create > New Application(s) with SCM.
    Screenshot of the Create Application button.
  2. Connect to your SCM:
    Connect the Source.
    1. Select Github Standard or Github Enterprise Cloud.
    2. Enter the personal access token created in GitHub (see Creating a personal access token) under Repository Access Token.
      Note: The personal access token provided here will be used to complete the onboarding process and will be subject to rate limits enforced by GitHub.
    3. Click Connect.

      You should receive a Connection Successful message and the Quick Start options should be visible. If your connection test is unsuccessful, check the following:

      • Your network connection is stable.
      • Check the Repository Access Token to make sure it is accurate.
      • Check that the Repository Access Token is still valid and has not expired.
      • Check that you selected the correct provider for your source repository.
      • Check that your organization allows use of personal access token (classic).
      • Check that your have authorized use of access token outside SSO (if applicable).

      Quick Start
  3. Select method: (Repository Mapping is different depending on the selection).
    • Matching Organization Names (Automatic)
    • Mapping Repositories (Custom)

    Mapping bulk import
  4. Assign Policies (optional): Choose Issue Policies or Test Schedule Policies, or both. All the projects created with this import will be assigned these policies.
  5. Assign Application Role (optional): Grant users access to all of the applications and projects you create with an application level role (Application Administrator, Application Contributor, Application Member, Application Observer, or custom roles).
    • The application level roles you select are applied to all of the applications that are being created.
    • Double-check that the user being assigned has access to the SCM repositories in GitHub.
  6. Repository Mapping: This will be different according to which method is selected.
    1. Automatic Mapping: Lists the matching organization names as applications and projects. You can view repositories to be imported by using the pulldowns (read only).
    2. Custom Mapping: Select New (type application name) or Existing (select application from pulldown), then select repositories from pulldowns under Projects. If an arrow is next to a name, you can click to select repositories within it. Click Add More to map repositories to multiple applications.
    Note:
    • GitHub organization maps to a Polaris application
    • GitHub repo maps to a Polaris project
    • GitHub branch maps to a Polaris branch
  7. Repository and Branch Monitoring (Optional): Allows you to sync your SCM Provider with Polaris and include non-default branches in your onboarding and sync. After onboarding is complete, you can manage these setting on the application level. See Synchronizing Polaris with your SCM Provider.
    1. Keep repositories and branches synchronized with SCM: Polaris will actively monitor repository updates, deletions, renames, and branch modifications, including updates, deletions, and renames, on the SCM provider. It will then implement the necessary changes to the corresponding Projects and Branches.

      Note: If this is selected without the additional branches option below, this will apply only to default branches.

    2. Continue to import new repositories for above organization. For example, if you create a new repo in GitHub, Polaris will create a new project in Polaris. This is not available when you use custom matching during bulk onboarding.

    3. Import additional branches matching substrings. Default branches are automatically imported but this allows you to import/sync non-default branches.

      1. When selected, a new input field will appear. Enter substrings separated by commas (i.e. -release, -demo)

      2. When selected, a checkbox is available if you want to Continue to import new branches matching substrings after the initial integration. Polaris will monitor for branch creation events on all the repos under the organization/application that match the specified substrings.

  8. Click Import Repositories.
  9. On your Portfolio page, a progress bar with a percentage done will track your progress.

    If the onboarding fails, an email notification will be sent to the user who initiated the onboarding. Detailed information on any synchronization failures can be obtained in Audit Logs.

    Click Cancel to cancel the import. Any repository in the process of being imported at the time of cancellation will complete in the background after the cancel is accepted. Then all onboarding will be stopped immediately. For example, if you import ten repositories and cancel at 50%, five repositories would be imported and five repositories would not.

  10. You can now set up event-based test automation. See Event-Based Test Automation in Polaris for SCM Repositories.

Update your SCM connections within an application

Update or add new personal access token to your SCM provider. If your token has expired or you need to update the scope in order to setup synchronization or event-based testing, follow these steps.

  1. On the Portfolio page, select an application by clicking on its name.
  2. Click Settings > Integrations.
  3. Click Update SCM Integration.
    Mapping bulk import
  4. Select Github Standard or Github Enterprise Cloud.
  5. Enter the personal access token created in GitHub (see Creating a personal access token) under Repository Access Token.
  6. Click the Connect button.

    You should receive a Connection Successful message. If your connection test is unsuccessful, check the following:

    • Your network connection is stable.
    • Check the Repository Access Token to make sure it is accurate.
    • Check that the Repository Access Token is still valid and has not expired.
    • Check that you selected the correct provider for your source repository.
    • Check that your organization allows use of personal access token (classic).
    • Check that your have authorized use of access token outside SSO (if applicable).
  7. If connection is successful, click Update Authentication.
    Mapping bulk import

Bulk integrating projects into an application

See Prerequisites before starting.
  1. On the Portfolio page, select an application by clicking on its name.
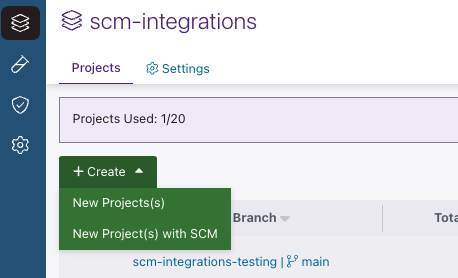
  2. On the Application page, select + Create > New Project(s) with SCM.
    Screenshot of the Add Project button location.
  3. Connect to your SCM:
    Screenshot of SCM Project Source location.
    1. Select Github Standard or Github Enterprise Cloud.
    2. Enter the personal access token created in GitHub (see Creating a personal access token) under Repository Access Token.
      Note: The personal access token provided here will be used to complete the onboarding process and will be subject to rate limits enforced by GitHub.
    3. Click Connect.

      You should receive a Connection Successful message. If your connection test is unsuccessful, check the following:

      • Your network connection is stable.
      • Check the Repository Access Token to make sure it is accurate.
      • Check that the Repository Access Token is still valid and has not expired.
      • Check that you selected the correct provider for your source repository.
      • Check that your organization allows use of personal access token (classic).
      • Check that your have authorized use of access token outside SSO (if applicable).

      Screenshot of Add bulk projects.
  4. Assign Policies (optional): Choose Issue Policies or Test Schedule Policies, or both. All the projects created with this import will be assigned these policies.
  5. Repository Mapping: Select repositories to import as new projects from pulldowns. If an arrow is next to a name, you can click to select repositories within it.
  6. Click Import Repositories.