Issue tracking integration for Azure DevOps
This page describes the issue tracking integration for Azure DevOps, and what you need to do to connect Polaris to Azure DevOps. Once configured, the issue tracking integration allows Polaris to create tickets in Azure DevOps for issues captured in Polaris.
Prerequisites and technical requirements
The issue tracking integration for Azure DevOps requires:
- An Azure DevOps Services instance.
Important: The Azure DevOps instance must be routable over the Internet. Closed networks are not supported at this time. Azure DevOps Server is not supported.
- Only organization administrators can connect Polaris to Azure DevOps.
- Authentication between Azure DevOps and Polaris is managed with a personal access token (PAT) that you create in Azure DevOps. The user associated with the PAT will be listed as the creator of any tickets created using the integration.
Tip: Consider using a PAT associated with a service account to better-identify the work items Polaris creates.
Work item fields
Each ticket Polaris creates in Azure DevOps includes the following fields:
- Title: the format of titles vary, depending on how the ticket was created:
- Tickets for issues you export manually:
Polaris - Project '<Polaris project name>' contains issue '<Issue Type>' - Tickets created for policy violations:
Polaris - Project '<Polaris project name>' contains issues violating policy '<Policy name>'
- Tickets for issues you export manually:
- Description: the format of descriptions vary, depending on how the ticket was created:
- Tickets for issues you export manually: detailed information about the issue, evidence (DAST issues only), remediation guidance, and helpful links.
- Tickets created for policy violations: the name of the violated policy, the names of any violated rules, and links you can use to view violating issues in Polaris.
- Created by: The user associated with the personal access token used for the integration.
Important: If other fields are required by your Azure DevOps project, exports will fail.
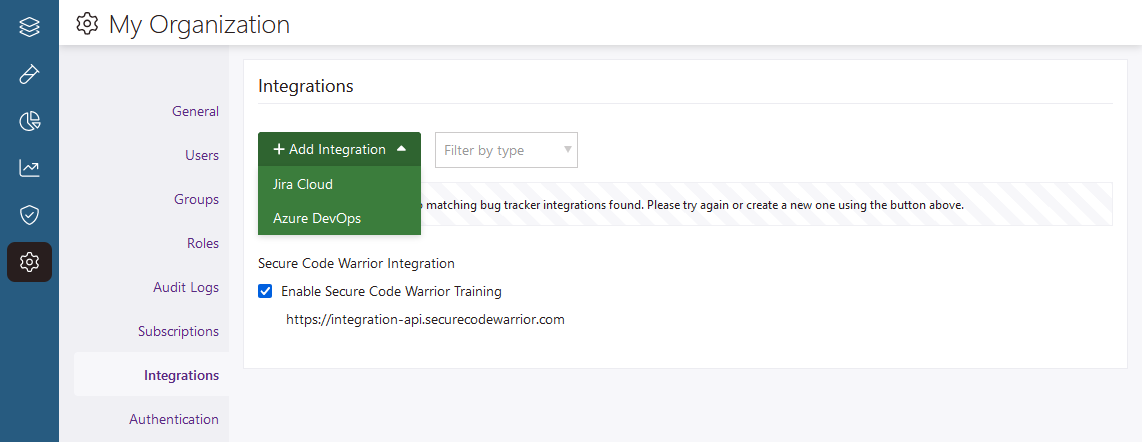
Connect Polaris to Azure DevOps
Create a personal access token
Add an Azure DevOps instance to Polaris
-
Select .
Connect a Polaris project to Azure DevOps
-
Under Issue Tracker, select an Azure DevOps instance from the Instance dropdown menu.
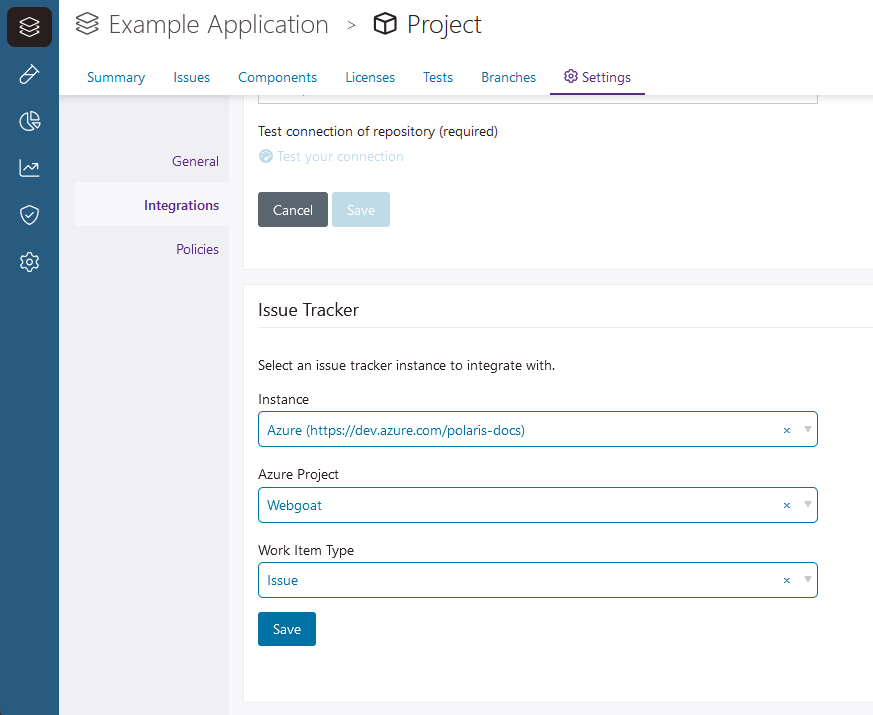
Note: Each Polaris project supports one issue tracking integration. You cannot add an issue tracking integration to a project that already has one configured.