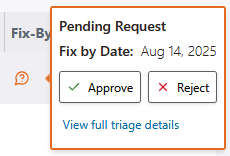
Learn how to approve or reject issue triage requests.
To approve or reject an issue triage request, follow these steps:
Note: Only Organization Administrators, Organization Application Managers, Application Administrators, and other users with permissions to approve issue triage requests can complete these steps.
-
Go to Portfolio, select an application, select a project, and go to Issues.
-
(Optional) Apply filters to find issues with pending approvals.
Tip: Open the filters panel and use the filter to show issues with pending approvals.
-
Approve or reject changes, as required.
- To approve or reject a single change (like a fix-by date), select the pending approval
 icon next to it, and then select Approve or Reject.

- To approve or reject all changes for one or more issues, select issues with the checkboxes on the left side of the table, and then select or .

Depending on your selection, the Request: Approved or Request: Rejected window opens.
-
(Optional) Summarize your decision using the Comment field.
-
Select Save.
After an issue triage request is approved, it can take up to 60 minutes for the change to affect reports and dashboards. Approval and rejection events are captured in the triage history panel. Approval events are emphasized in green, and rejection events are emphasized in red.
 | Dev Portal
